Recently, I finished a personal project in which I analyzed the results of the “Who is your favorite Pokemon” survey. After that, I wanted to generate a more interactive visualization in which the user could choose a specific Pokemon and see its results. After pondering different options, I decided to do so in Bokeh because of a few reasons. First of all, you can generate your visualizations using Python only. Furthermore, it is very easy to incorporate Bokeh in Jupyter notebooks, which is great to generate a first version of the prototype. Lastly, a few colleagues of mine have used it for their projects at work and have been very happy with it.
However, I wanted to be able to share the Bokeh app with the general public, preferably through a single URL, due to easiness. This is where things started to get a bit tricky. Bokeh’s documentation states a few options to do so, but they aren’t very straightforward, since they require setting up a hosting system on a server. After some googling, I came across a post by Jacob Deppen, where he described my exact same situation. He suggested doing so using Binder.
Binder is an (open source) web service that takes a GitHub repository and creates a shareable, interactive, reproducible environment in the cloud. This is a perfect solution for what I wanted to achieve. It even has a small tutorial that explains how to deploy a Bokeh app. Unfortunately, I had a few issues to get everything up and running. After more days than I care to admit working on this, I got it working. Therefore, in this post I want to give a more detailed tutorial on how to do so.
1. Create a (new) repository with the proper structure
First, to make things easier for us, we need to create a new (GitHub) repository that will be exclusively dedicated to the interactive visualization. It needs to have the following structure:
README.md (optional)

LICENSE (optional)

.gitignore (optional)

bokeh-app
|----main.py

.binder
|----bokehserverextension.py
|----environment.yml
|----postBuild
2. Prepare the files
The files in the bokeh-app directory are the files required for your app to run.
main.py
This file will contain the code of your Bokeh app.- Furthermore, here you can have additional files, different directories where your data are located, where your outputs are saved, etc.
The files in the .binder directory are needed to deploy your app in Binder.
bokehserverextension.pyThis file should have the following content:
1
2
3
4
5
from subprocess import Popen

def load_jupyter_server_extension(nbapp):
"""serve the bokeh-app directory with bokeh server"""
Popen(["bokeh", "serve", "bokeh-app", "--allow-websocket-origin=*"])
environment.ymlIn this file, you should define the dependencies of your app (e.g.,numpy,pandas, etc.). It should have at least the following:
1
2
3
4
5
6
dependencies:
  - bokeh
  - pip
  - pip:
    - nbserverproxy
    - jupyter-server-proxy
postBuild
This file should have the following content:
1
2
3
4
5
6
7
8
# Enable nbserverproxy
jupyter serverextension enable --sys-prefix nbserverproxy

# Install the bokeh server extension so that Bokeh launches at startup
mv .binder/bokehserverextension.py ${NB_PYTHON_PREFIX}/lib/python*/site-packages/

# Enable Bokeh extension
jupyter serverextension enable --sys-prefix bokehserverextension
3. Commit and push your repository to GitHub
Pretty straightforward.
4. Launch Binder
Lastly, you will actually launch Binder. It is very simple, but you need to be careful to get it right. Go to https://mybinder.org/, where you will see the following panel:
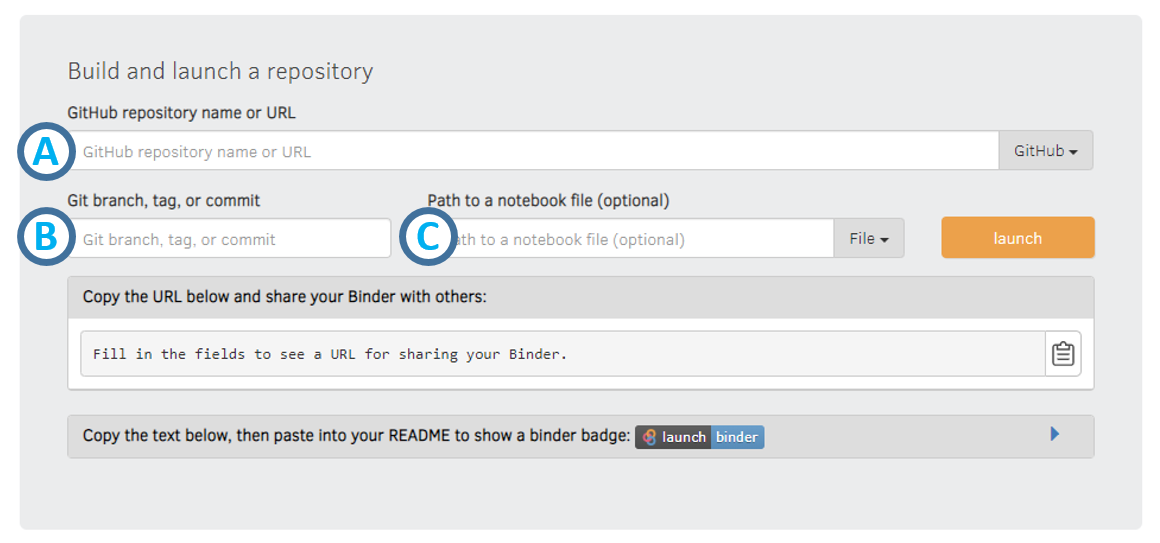
In A, paste the link to your repository. I prefer working with GitHub, but you can also use other types of repositories (e.g., GitLab). If you do, make sure you change it in the corresponding drop-down menu.
In B, paste the ID of a specific branch, tag, or commit that you wish. This is optional. If you aren’t doing anything fancy and want to generate a link for the master branch of your latest commit, you can leave it empty
In C, write /proxy/5006/bokeh-app. Also, make sure to change from File to URL.
The first time you run it, it will take long, since Binder will create the image for your app. If everything went right, it will open a tab in your favorite navigator with you app running. You can use that link to share your app. Good job!
Bonus: Troubleshooting, tips & tricks
- When building your Binder, be sure to show the console. You could see potentially useful information about errors there.
- If you make a change in your app, you will need to push it to your repository and do step 4 again.
- Be careful of your dependencies! You might need to define more dependencies than you think. Debugging your environment might be useful (more on that below)
- Watch out for your paths! If you are using paths for certain files (e.g., read data files), make sure to define them relative to where
main.pyis. - Debugging. This one can be a real life-saver. To debug your app, create a Python environment from the
environment.ymlfile. Then, runbokeh serve bokeh-appat the top level of your repository (and not within thebokeh-appdirectory), since that is where Binder is running Bokeh. Then, look at the errors that pop in the terminal.
Closing remarks
Big shout out to @betatim for helping me start with the deployment of my app in Binder. Huge shout out to @jdkent for taking time of his busy graduate student life to help me debug my app.
You can actually see my Bokeh app in action here (be patient, it can take a while to load). Furthermore, you can also take a look at its corresponding GitHub repository here.
If you have any comments, questions or feedback, leave them in the comments below or drop me a line on Twitter (@amoncadatorres). Moreover, if you found this useful, fun, or just want to show your appreciation, you can always buy me a cookie. Cheers!